

OpenClaw has quickly gained attention for a simple reason: it pushes AI beyond conversation and into action. Instead of stopping at answers, it gives developers a way to build agents that can interact with tools, execute tasks, and plug into real-world workflows from the chat environments people already use every day.
That flexibility becomes even more powerful when you connect OpenClaw to web data. In many practical agent workflows, the challenge is not generating text but accessing fresh, structured information from websites in a way that is reliable and easy to extend. This is where a custom plugin becomes valuable, allowing an OpenClaw agent to move beyond its built-in capabilities and interact with external services designed for search, scraping, and crawling.
In this tutorial, we will build a custom OpenClaw plugin that equips an agent with web data capabilities using Olostep. Along the way, you will see how the OpenClaw plugin system works, how tools are registered, and how to create a practical integration that can scrape pages, crawl websites, and retrieve structured content for real agent workflows.
What Is OpenClaw?
OpenClaw is an agent framework designed to help developers build AI systems that can do more than generate text. Instead of functioning purely as a conversational interface, it allows agents to work with tools, interact with external services, and carry out practical tasks inside structured workflows.
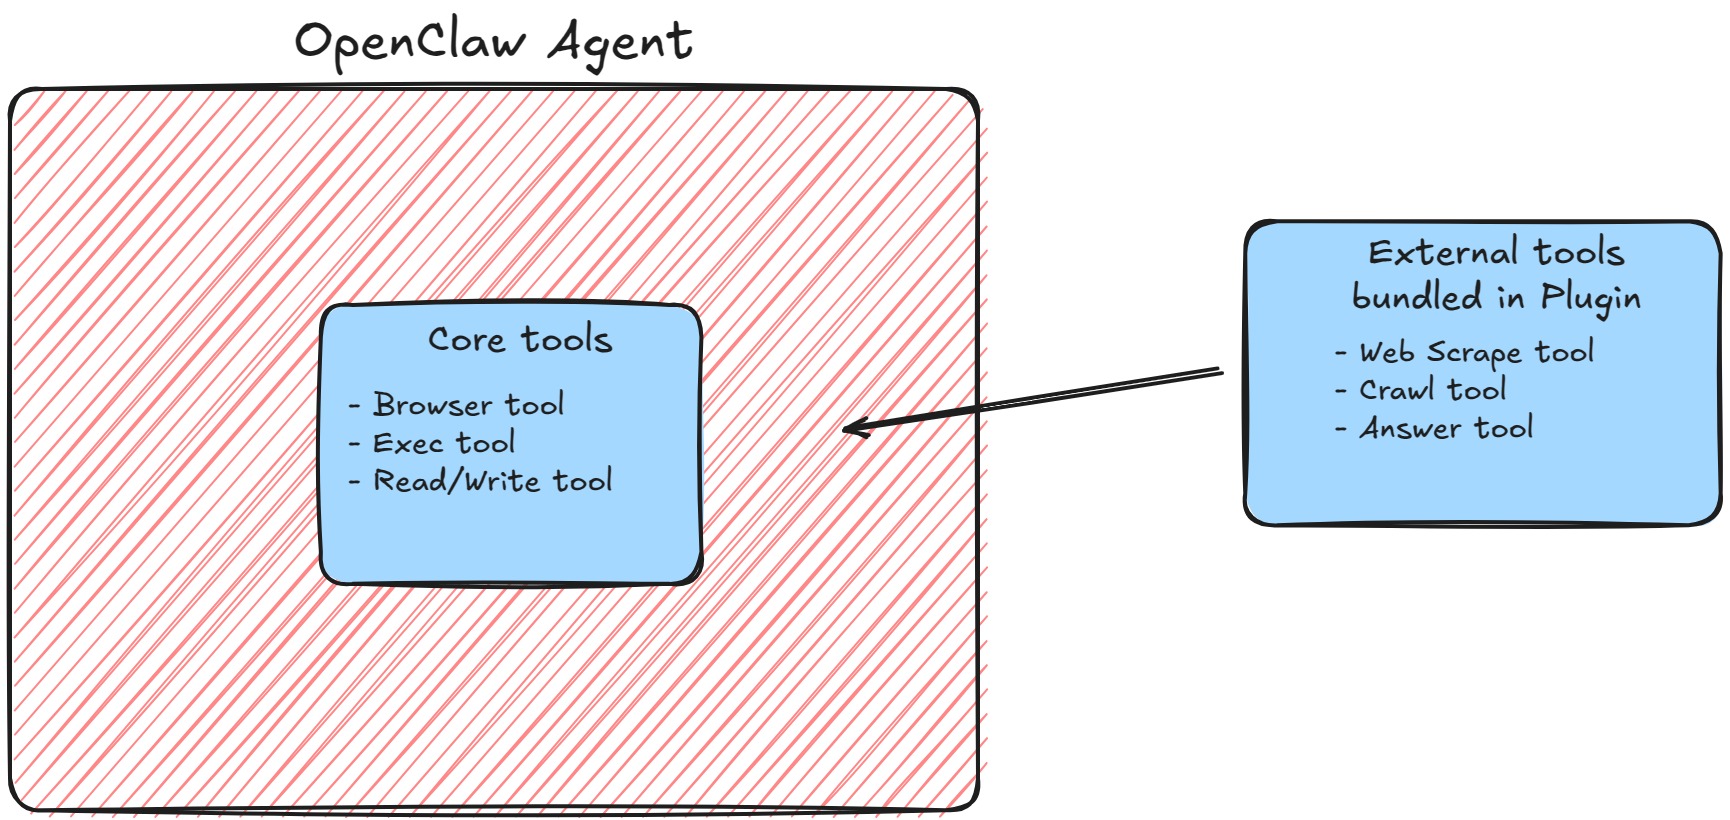
One of the strengths of OpenClaw is that it is built to be extended. Through its plugin system, developers can add new functionality such as tools, skills, channels, and model providers without modifying the core system itself. This makes OpenClaw flexible enough to support use cases where an agent needs capabilities that are not available out of the box.
That extensibility is what makes the Olostep integration possible. Rather than changing the core system, we can build a custom plugin that gives the OpenClaw agent access to web scraping, crawling, and structured content retrieval.
What Is Olostep?
Olostep is a web data API built for AI developers who need reliable access to live website content without having to manage scraping and crawling infrastructure themselves. It provides capabilities such as web search, page scraping, site crawling, and answer generation, making it a practical choice for agent-based workflows that depend on fresh, structured information from the web.
Within this integration, Olostep acts as the web data layer for the plugin. Instead of building a scraping system from scratch, we can use Olostep to start scrape jobs, retrieve cleaned content, crawl websites across multiple pages, and generate answers based on web content. This keeps the focus on extending OpenClaw with useful functionality rather than building the infrastructure ourselves.
That is what makes Olostep a strong fit for OpenClaw. OpenClaw provides the agent framework and plugin system, while Olostep provides an API to search, extract and structure Web Data that helps the agent work with external content in a more practical and scalable way.
Why Use Olostep with OpenClaw?
OpenClaw is already designed to work with tools, but many useful agent workflows depend on access to live web data that goes beyond basic browsing. If you want an agent to pull structured content from a page, crawl a website across multiple URLs, or answer questions based on external web content, you need a reliable, scalable and cost-effective way to connect those capabilities into the agent itself. That is where Olostep becomes valuable.
By integrating Olostep with OpenClaw, you give the agent a practical web data layer without having to build scraping and crawling infrastructure from scratch. This allows the focus to stay on exposing the right tools inside OpenClaw so the agent can retrieve content, monitor websites, and support more useful research or automation workflows.
With the right plugin tools in place, an OpenClaw agent can gather web content for research, check updates across a site, monitor competitors, extract structured information from pages, or answer questions based on live external sources. In that sense, Olostep helps turn OpenClaw into a web-aware agent.
Prerequisites
Before getting started, make sure your local environment is ready to build and install an OpenClaw plugin. You should already have OpenClaw running locally, access to the OpenClaw dashboard and gateway, and a basic development setup for working with a Node.js project. Since the plugin logic is written in TypeScript, it also helps to be comfortable reading and editing JavaScript or TypeScript files.
You will also need an Olostep API key, since the plugin relies on Olostep for scraping, crawling, and answer generation. In addition, you should have a working local environment where you can create the plugin files, install dependencies, run OpenClaw commands, and restart the gateway once the plugin has been added.
Before moving forward, make sure you have the following in place:
- OpenClaw installed locally
- Access to the OpenClaw dashboard and gateway
- Node.js and npm installed
- An Olostep API key
- A local project directory for the plugin
- Basic familiarity with JavaScript or TypeScript
- Permission to install and run local packages from the command line
How OpenClaw Plugins Work
OpenClaw plugins are used to extend the platform beyond its built-in capabilities. Rather than modifying the core system directly, a plugin lets you package new functionality in a separate project that OpenClaw can recognise and load. This makes it possible to add custom tools, skills, channels, model providers, and other extensions while keeping the core agent environment clean and modular.
At a practical level, an OpenClaw plugin is a Node.js project that uses the OpenClaw Plugin SDK. The plugin usually includes a manifest file that defines metadata and configuration, a package.json file that declares dependencies and compatibility details, and an entry file where the plugin logic is registered. In this case, that entry point is index.ts, which is where the Olostep client is initialised, and the plugin tools are added to OpenClaw.
OpenClaw reads the plugin’s configuration, loads the entry point, and exposes any registered tools to the agent. Once installed, those tools behave like part of the OpenClaw environment, which allows the agent to call them during real workflows. That is what makes the plugin system so useful: instead of being limited to the default toolset, you can shape the agent around the exact capabilities your use case requires.
Project Structure
Before writing the plugin logic, it helps to keep the project structure simple and predictable. The plugin is organised as a small Node.js project with three core files: package.json, openclaw.plugin.json, and index.ts. Together, these files define the plugin’s dependencies, metadata, configuration, and tool registration logic.
The package.json file manages the project dependencies and declares the OpenClaw-specific compatibility details needed for the plugin to run correctly. The openclaw.plugin.json file acts as the manifest, where you define the plugin’s identity and configurable values such as the Olostep API key. The index.ts file contains the main implementation, including the plugin entry point and the tools that will be exposed to the OpenClaw agent.
Your directory structure should look like this:
olostep_openclaw_tool/
├── package.json
├── openclaw.plugin.json
└── index.ts
With this structure in place, we can move on to creating the files that define the plugin and prepare it for the implementation step.
Create the Plugin Files
With the project structure in place, the next step is to create the files that define the plugin and tell OpenClaw how to load it. This starts with two key files: package.json, which handles dependencies and compatibility details, and openclaw.plugin.json, which acts as the plugin manifest. Together, they give OpenClaw the information it needs before the implementation is added to index.ts.
Create package.json
Start by creating the package.json file. This defines the project metadata, dependencies, and the OpenClaw-specific configuration needed for the plugin to work.
{ |
This file declares the plugin name, sets the project to use ES modules, and points OpenClaw to the index.ts entry file. It also defines the compatibility requirements for the plugin API and gateway version so the plugin can load correctly in your local OpenClaw environment.
Create openclaw.plugin.json
Next, create the manifest file. This is where you define the plugin metadata and expose any configuration that should be editable through the OpenClaw dashboard.
{ |
The id in this manifest should match the plugin name defined in package.json. The configSchema section tells OpenClaw what configuration values the plugin expects, while uiHints controls how those values appear in the dashboard. In this case, the Olostep API key is exposed as a sensitive field so it can be entered securely.
The uiHints section controls how the API key field is displayed in the OpenClaw dashboard, including the label, placeholder text, and sensitive input handling.
Implement the Plugin Logic in index.ts
With the plugin files in place, the next step is to define the actual behaviour of the plugin inside index.ts. This is where OpenClaw loads the plugin entry point, initialises the Olostep client, and registers the tools that will be made available to the agent.
The implementation is built around the OpenClaw Plugin SDK. Using the SDK, we can define the plugin entry, access the plugin configuration, and register each tool with its own name, description, parameters, and execution logic. Since the Olostep API key is already exposed through the manifest, the plugin can read that value from the configuration and use it to create the Olostep client when the plugin is loaded.
Our plugin will rely on two main dependencies: OpenClaw and Olostep, which we will interact with through the Olostep SDK.
To make the code easier to follow, we will break the implementation into a few parts: importing the required dependencies, defining the plugin entry point, initialising the Olostep client, and registering the individual tools. Once those pieces are in place, the plugin will be ready to expose scraping, crawling, and answer-generation capabilities inside OpenClaw.
Import the required dependencies
Start by importing Olostep, the OpenClaw plugin helpers, and the TypeBox utility used to define tool parameters.
import Olostep from 'olostep'; |
These imports provide everything needed to define the plugin. Olostep is used to interact with the external API, definePluginEntry creates the plugin entry point, OpenClawPluginApi gives access to the plugin registration interface, and Type is used to declare the expected input schema for each tool.
Define the plugin entry point
Next, define the plugin entry using definePluginEntry. This is where you register the plugin metadata and expose the register method that OpenClaw will call when loading the plugin.
export default definePluginEntry({ |
The id should match the values already defined in both package.json and openclaw.plugin.json. The register method is the main hook into the OpenClaw plugin system, and it is where all plugin functionality will be added.
Initialise the Olostep client
Inside the register method, create the Olostep client using the API key stored in the plugin configuration.
export default definePluginEntry({ |
Because the API key was defined in the manifest, it becomes available through api.pluginConfig. Initialising the client here ensures that the plugin can authenticate with Olostep as soon as OpenClaw loads it, which sets the stage for registering the scraping, crawling, and answer tools that follow.
Register the plugin tools
With the client ready, the final step is to register each tool that the OpenClaw agent will be able to call. Each tool is registered through api.registerTool, where you define its name, description, input parameters, and execution logic. The next section goes through each tool one by one so you can see exactly how the plugin exposes Olostep’s functionality inside OpenClaw.
Register Each Tool
With the plugin entry point in place and the Olostep client initialised, the next step is to register the tools that will be exposed to the OpenClaw agent. Each tool defines a specific capability, such as starting a scrape, retrieving content, answering a question, or crawling a site. Together, these tools give the agent access to Olostep’s web data capabilities.
In OpenClaw, tools are registered through api.registerTool. Each registration includes the tool name, a short description, the expected input parameters, and the execute function that runs when the tool is called. This structure keeps each capability modular and makes it easier to extend the plugin over time if you want to add more tools later.
Scrape Tool
The first tool starts a scrape job for a given URL using the Olostep Scrape API and returns the scrape ID. This is useful when you want the agent to begin extracting content from a specific page and then fetch the result separately once the job is complete.
api.registerTool({ |
Here, the tool accepts a single url parameter, passes it to the Olostep scrape API, and returns the resulting scrape ID as text. The scrape job runs asynchronously, so that ID is then used by another tool to retrieve the completed content.
Get Scraped Content
Once a scrape has finished, the next tool can be used to retrieve the scraped output. This allows the agent to pull back the cleaned content from a completed scrape job using its ID.
api.registerTool({ |
This tool accepts the scrape ID as input, calls the relevant Olostep method, and returns the scraped content in markdown form. In practice, this is what turns the earlier scrape job into something the agent can actually work with.
This step completes the two-part scrape workflow by retrieving the finished output after the asynchronous job has completed.
Answer Tool
The answer tool allows the agent to ask a question and receive an answer generated by searching and validating web content, along with the supporting sources. This is useful when the goal is not just collecting raw page data, but searching for answers using the Web as a knowledge base.
api.registerTool({ |
This tool takes a question as input, sends it to the Olostep answer API, and returns both the generated answer and its sources. That makes it especially useful for research-style workflows where the agent needs a concise response tied back to web content.
Crawl Tool
Unlike the scrape tool, which focuses on a single page, the crawl tool starts a broader crawl job across a website using the Olostep Crawl API. This is useful when the agent needs to collect information from multiple pages on a domain rather than extract content from just one page. It starts the crawl job and returns a crawl ID.
api.registerTool({ |
This tool accepts a url, starts the crawl job through Olostep, and returns the crawl ID. In this example, the crawl is limited to 30 pages, which gives the agent a controlled way to collect site-wide content without trying to crawl the entire web.
This is especially useful in a multi-step crawl workflow, where the agent needs to wait until the crawl is ready before retrieving the collected pages.
Get Crawl Info
After starting a crawl, it is often useful to check its status before trying to retrieve all of the collected pages. This tool handles that by returning information about the crawl job, including its status and progress.
api.registerTool({ |
The tool takes a crawl id, checks the crawl job through Olostep, and returns a summary of its current state. This makes it easier for the agent to decide whether the crawl is still running or ready for the next step.
Get Crawl Pages
Once the crawl is complete, the final tool can be used to retrieve the pages and content collected during that crawl. This gives the agent access to the actual site data gathered across multiple URLs.
api.registerTool({ |
This tool iterates through the crawled results, counts the pages returned, and combines each page URL and its content into a single response.
At this point, the plugin has everything it needs to let an OpenClaw agent scrape a page, crawl a site, retrieve structured web content, and generate answers from external sources.
Scrape vs Crawl vs Answer: When to Use Each Tool
Although these tools all help an OpenClaw agent work with web data, they are designed for different jobs. Choosing the right one depends on whether you need content from a single page, information from multiple pages across a site, or an answer generated and grounded in web data
When to use the scrape tool
Use the scrape workflow when you want to extract content from a single page. In this case, the agent starts the job with scrape_tool and then retrieves the finished output with get_scraped_content.
This is the best option when you already know the exact URL you want to work with and only need the content from that page rather than the wider site.
When to use the crawl tool
Use the crawl workflow when the agent needs to collect data from multiple pages. Here, crawl_tool starts the crawl, get_crawl_info checks its status, and get_crawl_pages returns the pages and content once the crawl is ready.
This is more suitable for broader research, site-wide monitoring, or workflows where the agent needs visibility across a larger section of a website rather than a single document.
When to use the answer tool
Use the answer tool when the goal is to return a direct response based on web information. Instead of giving the agent a block of page content to work through, answer_tool allows it to search the web and receive an answer with supporting sources.
This makes it especially useful for research-oriented tasks where you let the agent search the web and decide which sources to consult to return an answer. A simple way to think about it is this: use scrape for one page, crawl for many pages, and answer when you want to get an answer grounded in web research and data.
Together, these tools give the plugin the flexibility to support different types of web-aware workflows without forcing every task through the same approach.
Full index.ts Example
Now that each tool has been registered individually, here is the complete index.ts file in one place. This makes it easier to review the full structure and see how the imports, plugin entry point, Olostep client, and tool registrations fit together.
import Olostep from 'olostep'; |
Looking at the full file, you can see that the structure remains compact: the plugin is defined once, the Olostep client is initialised inside the register method, and each capability is added through a separate api.registerTool call. This keeps the plugin modular and makes it easier to expand later if you want to add more web-related tools or refine the output format for specific workflows.
How to Install the Plugin in OpenClaw
With the plugin logic complete, the final step is to install it locally in OpenClaw and make it available to the agent. This part of the process is straightforward: install the plugin from the project directory, restart the OpenClaw gateway, open the dashboard, and add your Olostep API key so the plugin can authenticate correctly.
Once those steps are complete, the tools registered in index.ts will become available inside your OpenClaw environment. At that point, the agent will be able to call the scraping, crawling, and answer-generation tools like any other capability exposed through the platform.
Install the plugin locally
From inside the plugin directory, run the following command:
openclaw plugins install . |
This installs the plugin locally so OpenClaw can recognise it as part of your environment. Because the plugin is being installed from the current directory, make sure you are running the command from the root of the project where your package.json, openclaw.plugin.json, and index.ts files are located.
Restart the OpenClaw gateway
After installation, restart the gateway so the new plugin can be loaded properly:
openclaw gateway restart |
This step ensures OpenClaw refreshes its environment and picks up the newly installed plugin. Without restarting the gateway, the plugin may not appear or become usable straight away.
Open the dashboard
Next, start the OpenClaw dashboard:
openclaw dashboard |
Add your Olostep API key
Once the dashboard is running, navigate to the automation tab and set your Olostep API key. This is required for the plugin to authenticate with the Olostep API.
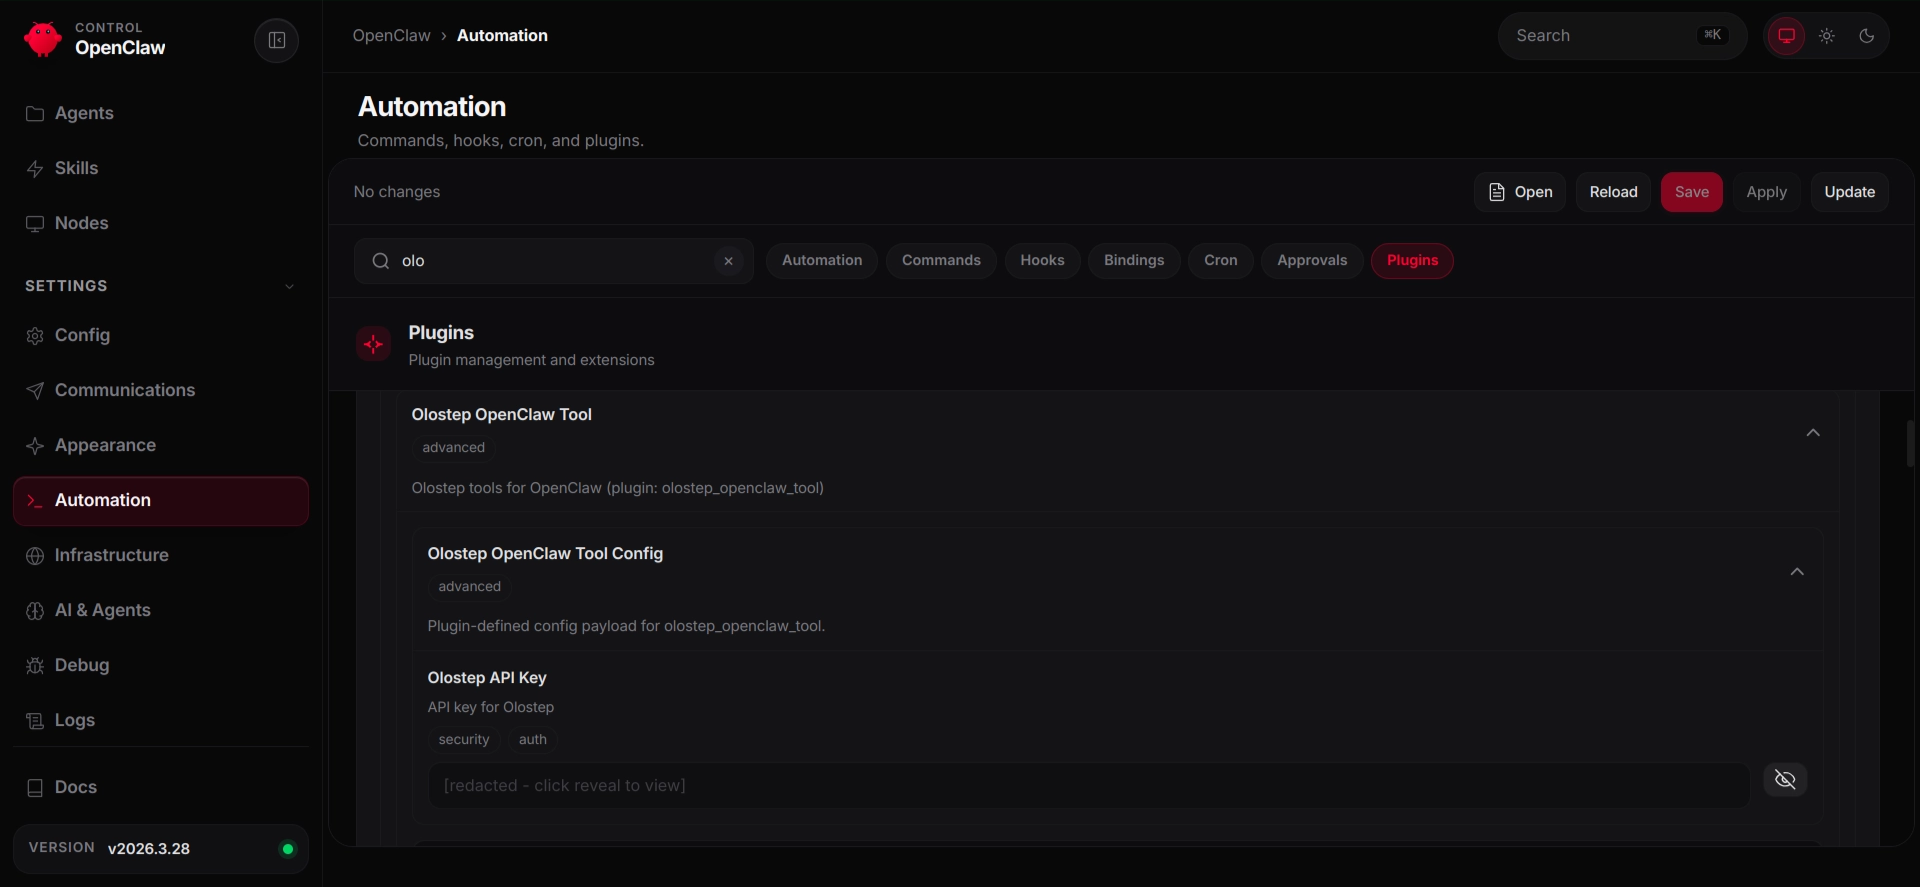
After entering the key, save your changes. This will automatically restart the gateway, and your agent will then be able to use the newly added Olostep tools to scrape websites, crawl domains, and retrieve structured web content.
Test the plugin tools
With the plugin configured, the next step is to test how the agent uses the new tools in practice. In this example, we use the OpenClaw dashboard as the interface and ask the agent to scrape the Olostep website.
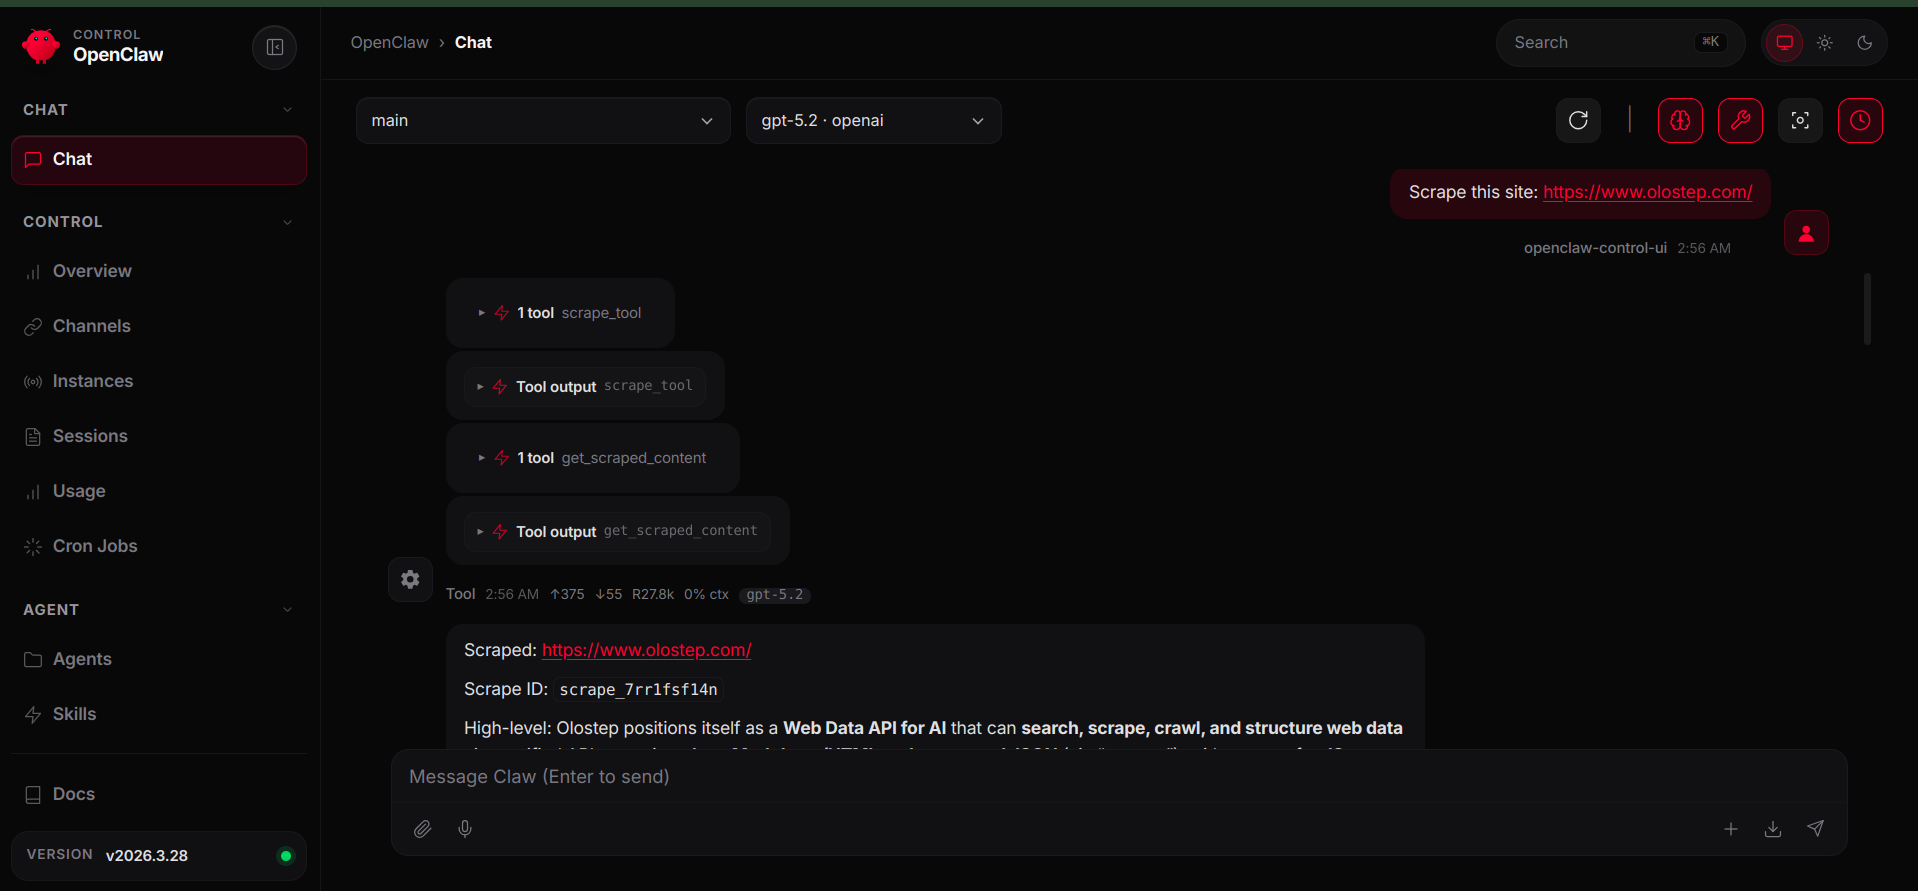
When the agent uses scrape_tool, it starts the scrape job for the requested page. It can then call get_scraped_content with the returned scrape ID to retrieve the cleaned content of that page and return the result to the user.
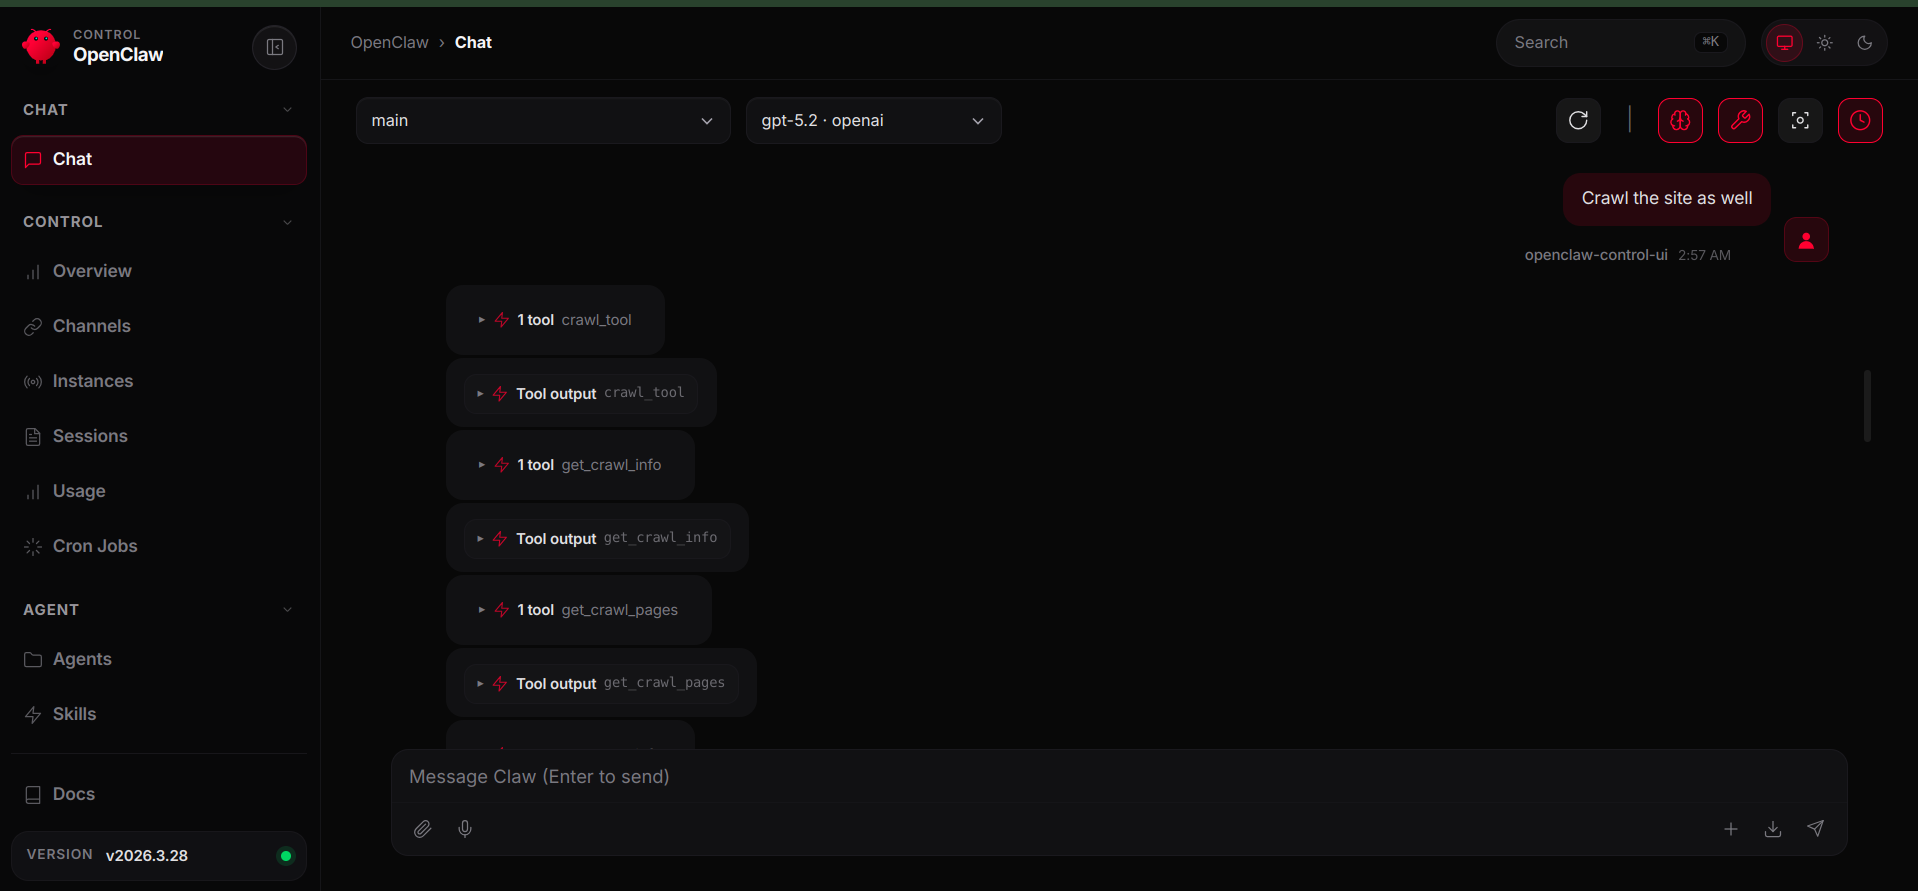
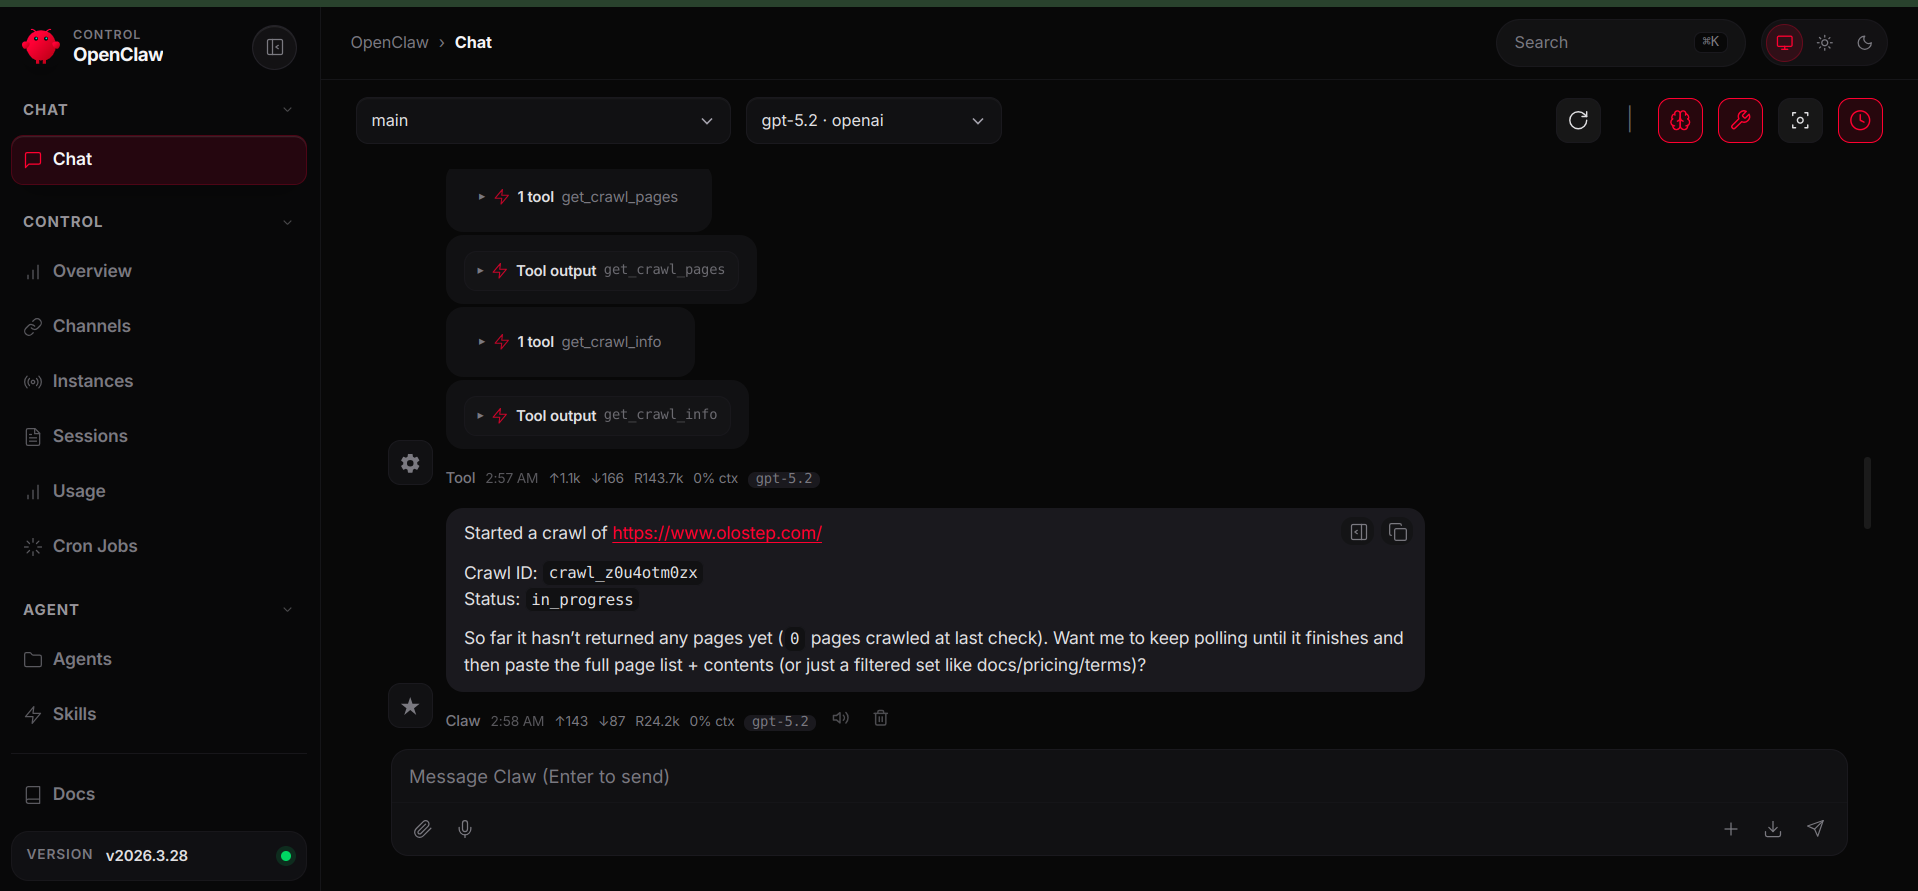
Next, we can test the crawl workflow. When asked to crawl the same site, the agent starts the crawl with crawl_tool and then checks progress with get_crawl_info. If the crawl is still running, the agent can return the current status rather than trying to fetch incomplete results.
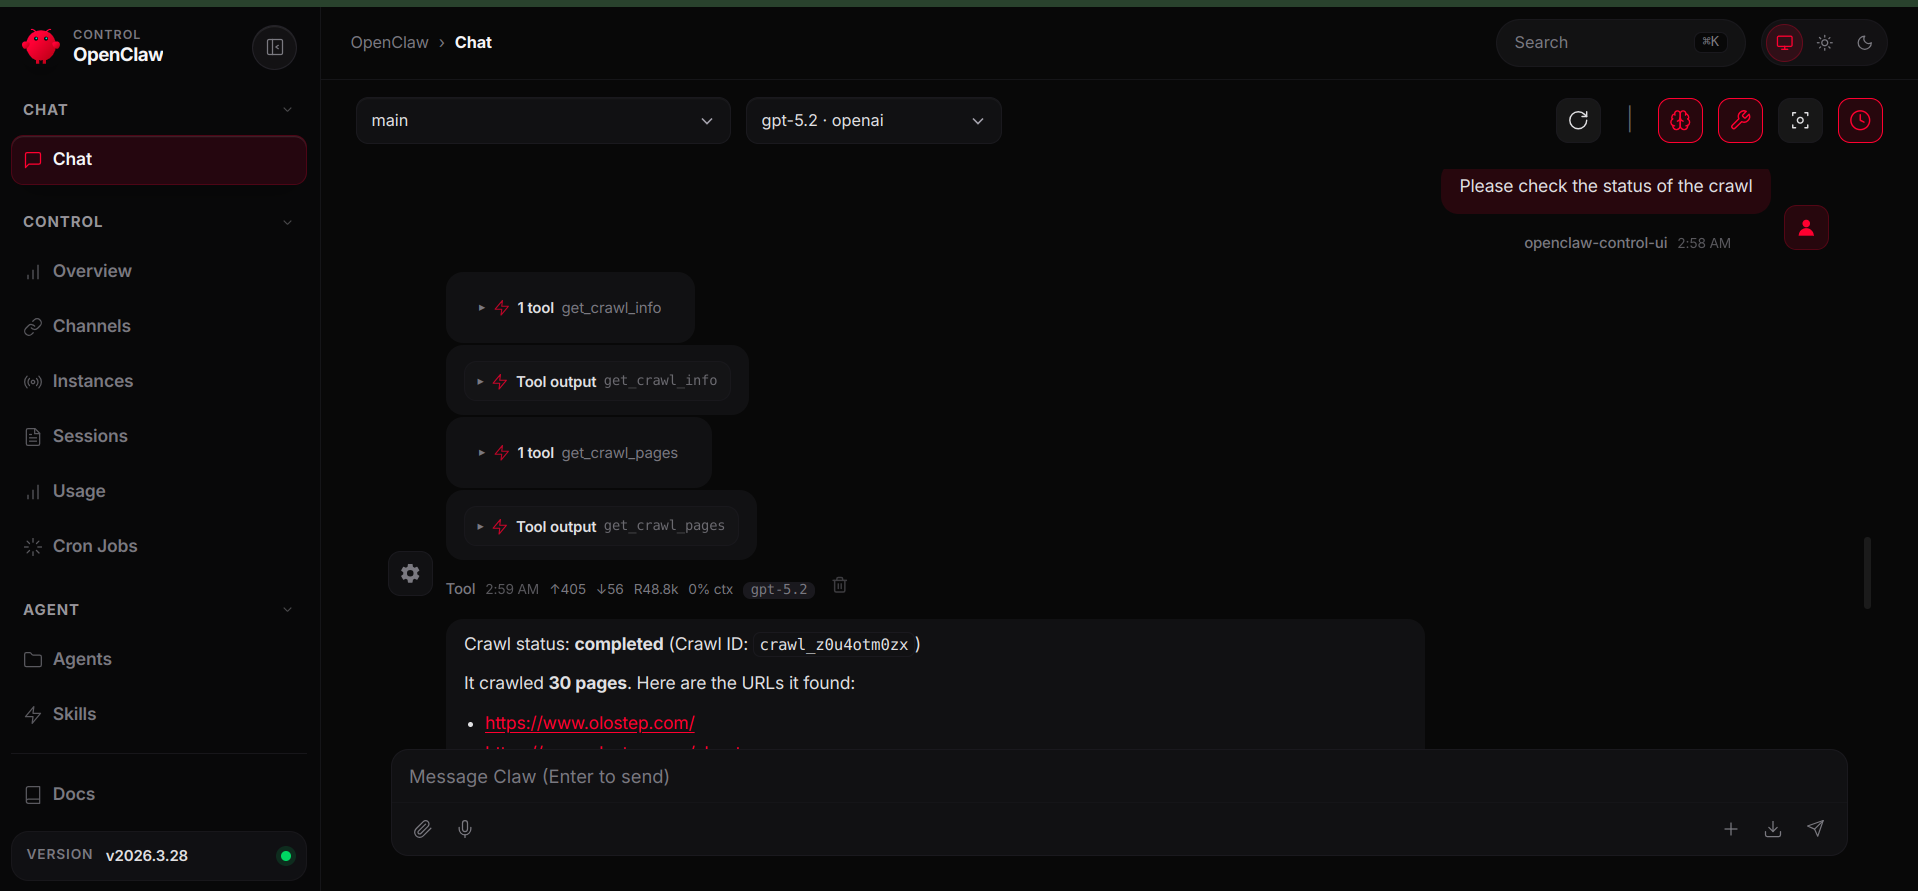
After the crawl has finished, prompting the agent again allows it to detect that the job is complete and use get_crawl_pages to retrieve the collected pages and content from across the site.
In this example, we used the OpenClaw dashboard as the communication channel. If you already have other channels configured, such as Telegram, you can use those instead and access the same plugin capabilities there.
Conclusion
OpenClaw is a versatile tool, and its plugin system makes it straightforward to extend what your agent can do. In this article, we explored how to push those boundaries by integrating Olostep, an API to search, extract and structure web data, giving the agent the ability to scrape, crawl and extract structured data from websites.
When you combine OpenClaw’s extensibility with capabilities such as web search, scraping, and crawling, the agent moves beyond being purely reactive and becomes genuinely useful in real workflows. You can build research agents that autonomously gather and synthesise information, or systems that continuously monitor the web and deliver updates directly into your chat app.
Once you understand this pattern, you can integrate almost any external capability and extend what your agent is capable of doing, building an AI that actually does things.
FAQs
What does this plugin add to OpenClaw?
This plugin adds six web data tools to OpenClaw: scraping, scraped content retrieval, answer generation, crawling, crawl status checks, and crawl page retrieval. Together, they let the agent work with live website content through Olostep.
Why do the scrape and crawl tools return IDs first?
The scrape and crawl workflows are asynchronous. Instead of returning the final content immediately, they return an ID first. That ID is then used to retrieve the completed result once processing has finished.
When should I use scrape_tool instead of crawl_tool?
Use scrape_tool when you need content from a single page. Use crawl_tool when you need content from multiple pages across a website.
Do I need an Olostep API key to use this plugin?
Yes. The plugin relies on Olostep for scraping, crawling, and answer generation, so you need a valid API key and must add it through the OpenClaw dashboard.
Can I install this plugin locally?
Yes. You can install it from the project directory with the OpenClaw CLI, then restart the gateway and add the required configuration in the dashboard.
Can I extend this plugin further?
Yes. Once the core integration is working, you can add more tools, improve output formatting, introduce error handling, or connect OpenClaw to other external services using the same plugin pattern.
